A command-line interface (CLI), also known as command-line user interface, is a means of interacting with a computer program where the user issues commands to the program in the form of successive lines of text (command lines). Command-line interfaces provide a more concise and powerful means to control the program than the GUI. Operating system command line interfaces are called a command-line interpreter, command processor or shell. It displays a prompt, accept a "command line" typed by the user terminated by the Enter key, then execute the specified command and provide textual display of results or error messages. When a shell is active a program is typically invoked by typing its name followed by command-line arguments (if any).
Each capability implemented in SPPAS corresponds to a program that can be invoked by its name in a shell. Such programs are located in the bin sub-directory of the sppas directory included in the SPPAS package. It is usual for a program to be able to display a brief summary of its parameters. Each program included in SPPAS provides its usage by using the option --help, as for example:
bin> annotation.py --helpThere are 2 types of programs in the sppas then bin sub-directory:
All programs are written with the programming language Python. The version of Python must be 2.7.something. Nothing will work with Python >= 3.0!
This chapter describes how to use the automatic annotations of SPPAS with a Command-Line Interface. It describes all available command and how to use it. However, for scripts that execute an automatic annotation, refer to the chapter "Automatic Annotation" to understand exactly each option!
Generally, resources are given to the CLI with the argument "-r", an input wav file is given with "-w" option, an input annotated file is given with "-i" and the output is specified with "-o".
This program performs automatic annotations on a given file or on all files of a directory. It strictly corresponds to the button Annotate of the GUI. All annotations are pre-configured: no specific option can be used.
usage: annotation.py -w file|folder [options]optional arguments:
-h, --help show this help message and exit
-w file|folder Input wav file name, or folder
-l lang Input language, using iso639-3 code
-e extension Output extension. One of: xra, textgrid, eaf, csv, ...
--momel Activate Momel and INTSINT
--ipu Activate IPUs Segmentation
--tok Activate Tokenization
--phon Activate Phonetization
--align Activate Alignment
--syll Activate Syllabification
--rep Activate Repetitions
--all Activate ALL automatic annotationsExamples of use:
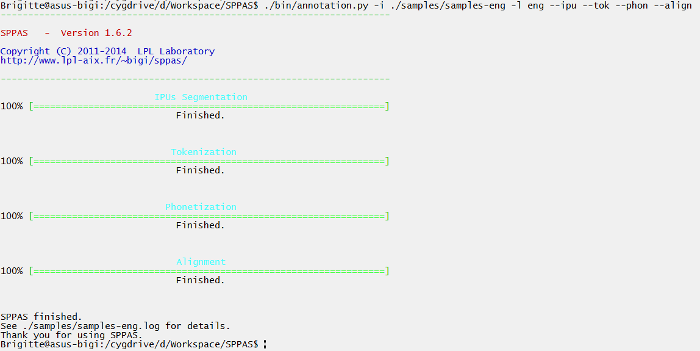
./sppas/bin/annotation.py ./samples/samples-eng
                    -l eng
                    --ipu --tok --phon --align
A progress bar is displayed for each annotation. At the end of the process, a message indicates the name of the procedure outcome report file, which is ./samples/samples-eng.log in our example. This file can be opened with any text editor (as Notepad++, vim, TextEdit, ...).
This program performs the IPU-segmentation, i.e. silence/speech segmentation. When this program is used from an audio speech sound and eventually a transcription, it consists in aligning macro-units of a document with the corresponding sound.
Notice that all time values are indicated in seconds.
usage: wavsplit.py -w file [options]Generic options:
    -w file         audio input file name
    -d delta shift  Add this time value to each start/end
                    bounds of the IPUs (for -o option only)
    -h, --help      show the help message and exit
Options that can be fixed for the Speech/Silence segmentation:
    -r float    Window size to estimate rms, in seconds
                (default value is: 0.010)
    -m value    Drop speech shorter than m seconds long
                (default value is: 0.300)
    -s value    Drop silences shorter than s seconds long
                (default value is: 0.200)
    -v value    Assume that a rms lower than v is a silence
                (default value is: 0 which means to auto-adjust)
Options that can be fixed for the Speech/Silence segmentation with a given orthographic transcription. It must be choose one of -t or -n options:
    -t file     Input transcription file with txt or
                textgrid extension (default: None)
    -n value    Input transcription tier number
                (in case of input as textgrid) (default: 0)
    -N          Adjust the volume cap until it splits
                into nb tracks (default: 0)
Output options:
    -o dir      Output directory name       (default: None)
    -e ext      Output tracks extension     (default: txt)
    -l file     File with units' boundaries (default: None)
    -p file     File with the segmentation  (default: None)
Examples of use to get each IPU in a wav file and its corresponding textgrid:
./sppas/bin/wavsplit.py -w ./samples/samples-eng/oriana1.WAV
-d 0.02
-t ./samples/samples-eng/oriana1.txt
-p ./samples/samples-eng/oriana1.xra

./sppas/bin/wavsplit.py -w ./samples/samples-eng/oriana1.WAV
-t ./samples/samples-eng/oriana1.xra
-o ./samples/samples-eng/oriana1
-e textgridThis program performs Tokenization, i.e. text normalization on a given file.
usage: tokenize.py -r vocab [options]

optional arguments:
    -r vocab         Vocabulary file name
    -i file          Input file name
    -o file          Output file name
    --delimiter char Use a delimiter character instead of a space for word delimiter.
    -h, --help       Show the help message and exit
The following situations are possible:
no input is given: the input is stdin and the output is stdout (if an output file name is given, it is ignored). In case of enriched orthographic transcription, only the faked tokenization is printed.
an input is given, but no output: the result of the tokenization is added to the input file.
an input and an output are given: the output file is created (or erased if the file already exists) and the result of the tokenization is added to this file..
Example of use, using stdin/stdout:
$ echo "The te(xt) to normalize 123." |\
  ./sppas/bin/tokenize.py
  -r ./resources/vocab/eng.vocab
$ the te to normalize one_hundred_twenty-three
In that case, the elision mentionned with the parentheses is removed and the number is converted to its written form. The character "_" is used for compound words (it replaces the whitespace).
Example of use on a transcribed file:
$ ./sppas/bin/tokenize.py -r ./resources/vocab/eng.vocab
  -i ./samples/samples-eng/oriana1.xra
-o ./samples/samples-eng/oriana1-token.xraThis program performs Phonetization, i.e. grapheme to phoneme conversion on a given file.
usage: phonetize.py -r dict [options]

optional arguments:
    -r dict      Pronunciation dictionary file name
    -i file      Input file name
    -o file      Output file name
    --nounk      Disable unknown word phonetization
    -h, --help   Show the help message and exit
Examples of use: ~~~~ $ echo "the te to normalize one_hundred_twenty-three" |
./sppas/bin/phonetize.py -d ./resources/dict/eng.dict --unk $ D.@|D.V|D.i: t.i: t.u|t.i|t.@ n.O:.r.m.@.l.aI.z UNK ~~~~
Example of use on a tokenized file: ~~~~ ./sppas/bin/phonetize.py -d ../resources/dict/eng.dict -i ../samples/samples-eng/oriana1-token.xra -o ../samples/samples-eng/oriana1-phon.xra ~~~~
This program performs automatic speech segmentation on a given file.
usage: alignment.py -w file -i file -r file -o file [options]

optional arguments:
    -w file     Input wav file name
    -i file     Input file name with the phonetization
    -I file     Input file name with the tokenization
    -r file     Model directory
    -o file     Output file name with alignments
    -a name     Aligner name. One of: julius, hvite, basic (default: julius)
    --extend    Extend last phoneme/token to the wav duration
    -h, --help  Show the help message and exit
Typical usage:
./sppas/bin/alignment.py
-r ./resources/models/models-eng
-w ./samples/samples-eng/oriana1.WAV
-i ./samples/samples-eng/oriana1-phon.xra
-I ./samples/samples-eng/oriana1-token.xra
-o ./samples/samples-eng/oriana1-palign.xraThis program performs automatic syllabification on a given file.
usage: syllabify.py -r config [options]

optional arguments:
    -r config   Rules configuration file name
    -i file     Input file name (time-aligned phonemes)
    -o file     Output file name
    -e file     Reference file name to syllabify between intervals
    -t string   Reference tier name to syllabify between intervals
    --nophn     Disable the output of the result that does not use the reference  tier
-h, --help Show the help message and exitThis program performs automatic detection of self-repetitions or other-repetitions if a second speaker is given.
It can be language-dependent (better results) or language-independent.
If an input is given, but no output: the result is appended to the input file.
usage: repetition.py -i file [options]

optional arguments:
  -h, --help  show this help message and exit
  -i file     Input file name with time-aligned tokens of the self-speaker
  -r folder   Directory with resources
  -l lang     Language code in iso639-3
  -I file     Input file name with time-aligned tokens of the echoing-speaker
              (if ORs)
-o file Output file nameusage: momel-intsint.py [options] -i file
optional arguments:
-i file Input file name (extension: .hz or .PitchTier)
-o file Output file name (default: stdout)
--win1 WIN1 Target window length (default: 30)
--lo LO f0 threshold (default: 50)
--hi HI f0 ceiling (default: 600)
--maxerr MAXERR Maximum error (default: 1.04)
--win2 WIN2 Reduct window length (default: 20)
--mind MIND Minimal distance (default: 5)
--minr MINR Minimal frequency ratio (default: 0.05)
--non-elim-glitch
-h, --help Show the help message and exitEach program opens a frame. The option -i allows to add a file in the frame; it can be added as many times as wanted.
THIS DOCUMENTATION IS TO DO... Any help is welcome!!!
Some scripts are also available to be used with the Command-Line Interface. They are located in the scripts sub-directory.
usage: trsmerge.py -i file -o file [options]

optional arguments:
  -h, --help  show this help message and exit
  -i file     Input annotated file name (as many as wanted)
  -o file     Output annotated file name
  --quiet     Disable the verbosity
usage: trsconvert.py -i file -o file [options]

optional arguments:
  -h, --help  show this help message and exit
  -i file     Input annotated file name
  -o file     Output annotated file name
  -t value    A tier number (use as many -t options as wanted). Positive or
              negative value: 1=first tier, -1=last tier.
--quiet Disable the verbosityusage: tierinfo.py -i file [options]
optional arguments:
   -h, --help      show this help message and exit
-i file Input annotated file file name
-t value Tier number (default: 1)This script extract the channel chosen from the input file and write it in an output file.
usage: extract.py -w inputfile -o outputfile -c channeloptional arguments:
-h, --help show this help message and exitThis script extract the channel chosen from input file and write the result in an output file. It can be:
or any combination of such options.
usage: reformat.py -w inputfile -o outputfile [options] optional arguments:
-h, --help show this help message and exit
-c Channel (default 1)
-r Framerate
-s Sample width
-m Factor to multiply each frame
-b Value to bias each frameThis script equalize the number of frames of each mono channel input files and write the results in output files.
usage: equalize.py -w inputfile [inputfile]* optional arguments:
-h, --help show this help message and exitThis script mix all channels from mono input files and write the channel result in an output file.
usage: channelsmixer.py -w input_file [inputfile]* -o outputfileoptional arguments:
-h, --help show this help message and exitThis script simulate a mix of all channels from input files and print the maximum value of the result.
usage: channelsmixer.py -w input_file [inputfile]*optional arguments:
-h, --help show this help message and exitThis script extract a fragment from an audio file.
usage: ./scripts/fragmentextracter.py -w inputfile -o outputfile [options]optional arguments:
-h, --help show this help message and exit
-bs The position (in seconds) when begins the mix
-bf The position (in number of frames) when begins the mix
-es The position (in seconds) when ends the mix
-ef The position (in number of frames) when ends the mixExample of use:
usage: ./scripts/fragmentextracter.py -w audiofile.wav -o fragment.wav -bs 2 -es 4This script performs a mix according to the settings given in parameter. A factor permits to attenuate the separation between the two output channels (the value is from 0 to 1).
Settings file must have the requered format:
The programm will look for each file by the filename found on each line. Audio files have to be in the same folder as the settings file.
usage: ./scripts/audiotoaster.py -s settingfile -o outputfile [options]optional arguments:
-h, --help show this help message and exit
-l Factor to attenuate the difference between the two output
channels. (default value : 0)
x = 0 will perform two channels as asked in the settings
0 < x < 1 will attenuate the difference
x = 1 will perform two identical channels
-b The position (in seconds) when begins the mix
-e The position (in seconds) when ends the mix
-v Verbosity level: 0, 1 or 2 (default=1)Example of use:
usage: ./scripts/audiotoaster.py -s ./samples/settings.txt -o mix.wav -l 0Brigitte Bigi © 2011-2015